Sunday, February 19, 2017

Steampunk kit by Kyrsty Scrapbook Design

The new digital kit by Kyrsty Scrapbook Design is a Steampunk style kit. I loved letting my imagination go mad with this first page I made using this kit, great fun!!


 The second page I made had a complacently different feel. I don't even think you would knew it came from a steampunk themed kit. That's the beauty with digital kits, the more oyu play with them the more ideas you have because they never run out and you can have everything in what ever size you want.


You can find this kit at Mischief Circus here - 
https://www.mischiefcircus.com/shop/product.php?productid=24284&cat=0&page=1

School kit from Kyrsty Scrapbook Design

I have manage to miss the past two kit launches for Kyrsty Scrapbook Design, due to holidays and timing, so I am catching up with them today.
   The first digital kit is a School themed kit. Lots of great elements for school pages here. This is my finished digital page.


don't be put off by it being a digital kit. If you don't do digital art then you can always print them off and use them in your paper crafting.

You can find this kit at Mischief Circus here - 
https://www.mischiefcircus.com/shop/product.php?productid=23938&cat=0&page=1

Saturday, February 18, 2017

Craftwork Cards Scrumptious kit swing card

  This is a card project using the Craft Work Cards Scrumptious paper pack I made for The Fruit Pixie who I design for. I started playing with this paper kit before Christmas and I must admit I loved it. Now that spring is starting to bloom here in the UK it is a nice bright paper pack to play with.


 I cut this card shape, a swing card, on my Silhouette Cameo but there are lots of different card blanks out there and of course you could do the same style on a plain card blank too.

          I used one of the papers for the front pannels and then one of the die cut sentiment for the front swing part of the card.

With every Craftwork Cards paper kit you always get some of their Candis. I used 4 of them on the four corners of my card. I used the small square 3D foam to lift them from the card.

Then just a small bow to add to finish off the card.

You can find the Craftwork Cards Scrumptious paper kit in the Fruit Pixie shop shop here - 
http://www.thefruitpixie.co.uk/craftwork-cards-8-x-8-collection-pack-scrumptious-25687-p.asp

the small 3D foam pads - 
http://www.thefruitpixie.co.uk/craftime-3d-foam-squares-2mm-20106-p.asp

MDF Collaged heart

  This year for my design work for The Fruit Pixie, I am aiming to do a mixed media piece each month to show you and as it was valentines day last week I decided to use one of the MDF hearts from Creative Expressions and create a mixed media collage dedicated to love.


For me the key to mixed media is to layer and layer and layer. 
So, to begin, I took one of the MDF hearts from the pack (you get 6 in each pack) and covered it with some of the paper from the IndigoBlu Memory lane stack.

I then added one of the Bo Bunny doilies to the right hand part of the heart.

I chose an image from the IndigoBlu Lost Families stack and cut her out. Then glued her down.

I then chose a stencil, this one is the rose stencil from IndigoBlu and using the Fired Brick Distress ink on some of the blending foam, worked it through the stencil to cover most of the heart except her face.

I stamped the sentiment, a stamp is from the Visible Images never grow up set, and cut it apart. Then glued it down.

To colour the edges of the MDF heart and give a slight border to my collage, I used the Cosmic Shimmer Gilding wax in Decadent wine. I applied it with a cloth and then buffed it up to a shine. I find dried out baby wipes are good for this!

To finish it off I add some stick pearls and used some of my chalk crayons to give it a grungy feel.

So as you can see lots and lots of layers!

You can find everything I used in the Fruit Pixies shop -

MDF Hearts - 
http://www.thefruitpixie.co.uk/creative-expressions-mdf-hearts-6-pack-25697-p.asp

All the IndigoBlu products here - 
http://www.thefruitpixie.co.uk/indigoblu-accessories-534-c.asp

Distress Ink here - 
http://www.thefruitpixie.co.uk/tim-holtz-distress-inks-83-c.asp

Bo Bunny dollies - 
http://www.thefruitpixie.co.uk/bo-bunny-doilies-small-4-25967-p.asp

Stamp Sentiment - 
http://www.thefruitpixie.co.uk/visible-image-never-grow-up-set-25228-p.asp

Cosmic Shimmer guiding wax -
http://www.thefruitpixie.co.uk/cosmic-shimmer-gilding-wax-677-c.asp

So there we are, I think I got all the products I used!!


Friday, February 03, 2017

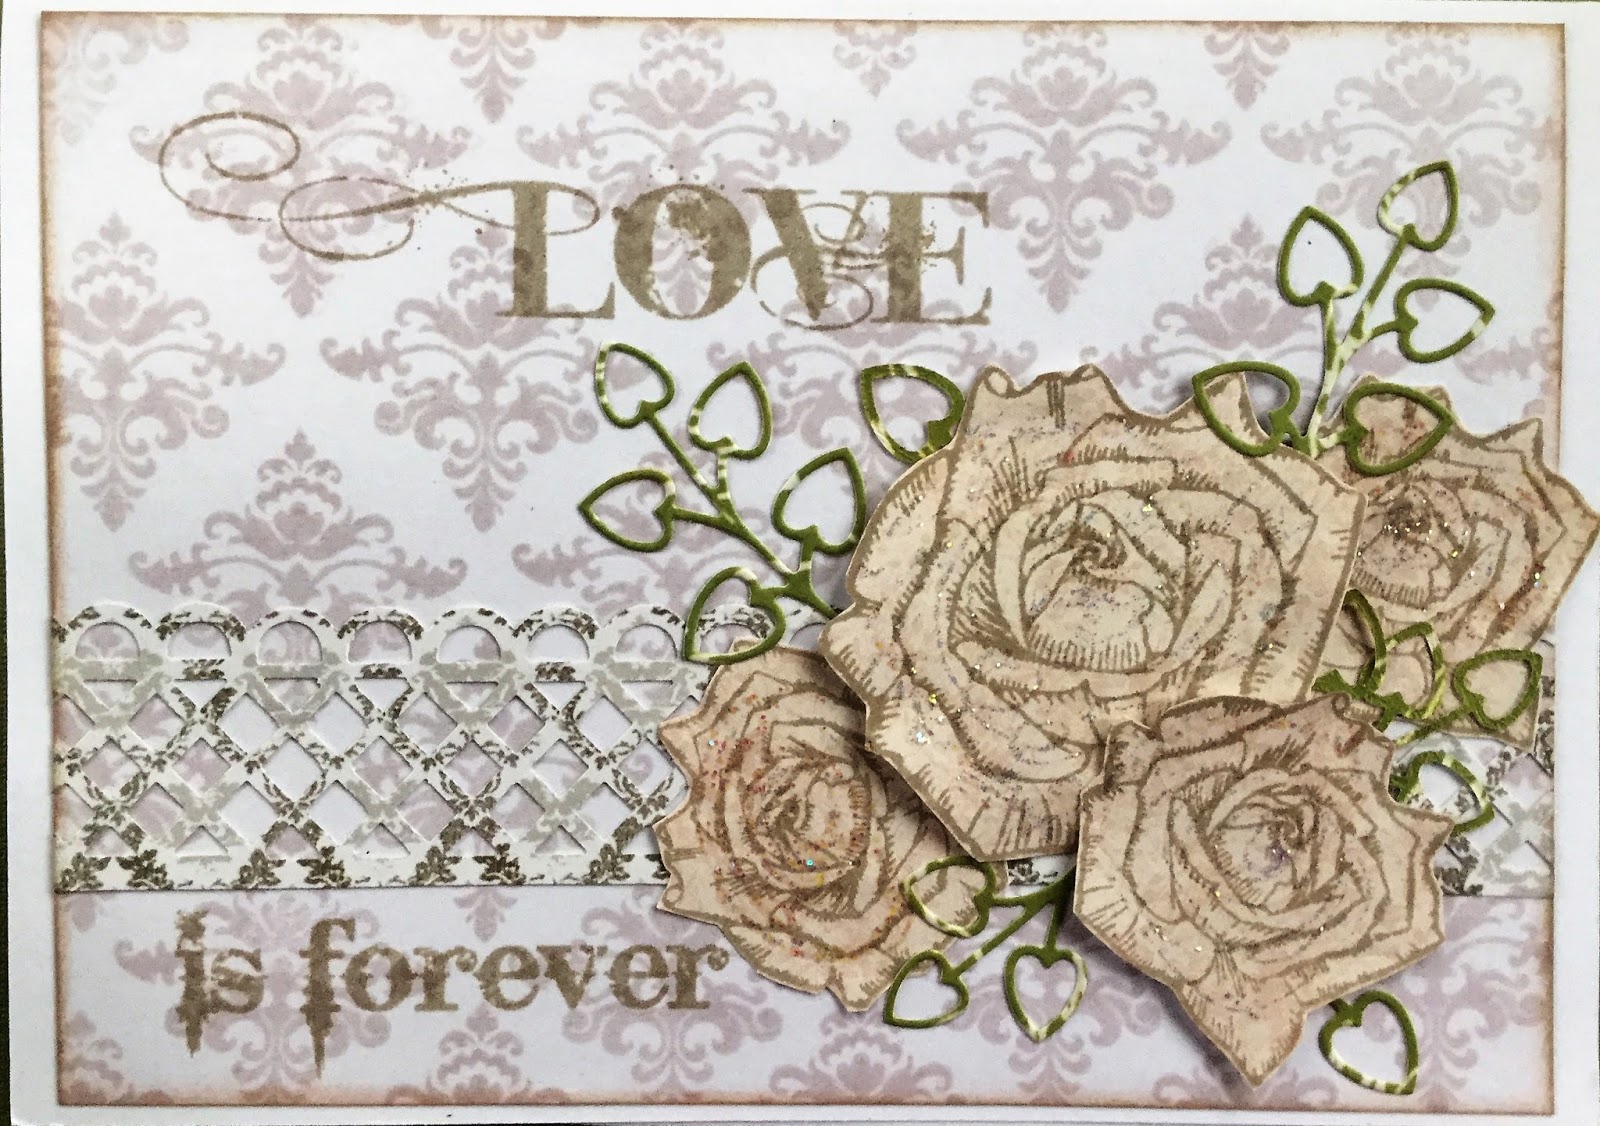
Rose love stamped card

  Now I have been crafting for many, many years and it was stamping that made my eyes light up and switch from needle work to paper crafting. That was until I discovered what we used to call altered art back in the day but now you would know it as mixed media and stamps lost their attraction.

   One of my new years arty goals for this year is to get back into stamping. So once a month, one of my weekly posts for the Fruit Pixie's blog and Facebook page will be a stamped project and here is the first one!

  It was my parents 56th wedding anniversary a few days ago and this is the card I made for them. Of course Valentines day is just around the corner so this would be a lovely card for that too or even for a summer wedding card.

  The stamp kit I was working with was the Visible Image Immortal Love set ( link below ).
 

To begin with the background. I cut a piece of white card slightly smaller then my 5x7 card blank. 
 I took the damask stamp from the set and stamped it may times to make the background using the Distress ink milled lavender.


For the roses arrangement I stamped the large rose once and the smaller rose 3 times onto a patterned paper using distress ink pumice stone. 
I then cut them out.
I made the card by first using a border punch from Mather Stewart and then layered the roses up using some 3D foam.
I cut some heart shaped leaves using a die and poked them into the rose arrangement.


I then stamped the "love" and "is forever" stamps onto the background using more of the Distress ink pumice stone.
I added a little stickles glitter to the centre of the roses and inked around the edges of the card front with both the milled lavender and the pumice stone.
I then mounted my card front onto my card blank to finish.


I hope you enjoyed my stamped project. If you have been inspired and would like to purchase the things I used, you can find them in the Fruit Pixie's shop using the links below.

5x7 card blanks - 
http://www.thefruitpixie.co.uk/5-x-7-card-blanks-511-c.asp

Visible Image stamp set -
http://www.thefruitpixie.co.uk/5-x-7-card-blanks-511-c.asp

Distress ink - 
http://www.thefruitpixie.co.uk/ink-pads-84-c.asp


Sunday, January 29, 2017

Craftwork cards Scrumptious paper flower box card

I have been having fun with the Craftwork Cards Scrumptious card kit available from The Fruit Pixie online shop who I very proudly design for.

   If you know Craftwork cards you will know that in each kit you will get a beautiful pad of 8x8 paper, stacks of die cuts and a bag of their matching Candies. The die cuts differ in each themed kit and with this kit you get some really cute flowers and some different sentiments.

  Now I'm not a big user of flowers but for some reason these really caught my eye. They are all different shapes and stack together to make wonderfully cute modern looking flowers. They have also included some cut into a spiral, which can be rolled up to become the centre of your flower.

  So, because of these lovely flowers. I decided to make a flower box card.


This card folds flat to post and is fairly simple to make, there are lots of free templates for this shape card and videos to help you put them together online. Mine was cut out using my Sillhouette Cameo.

I cut the box out in blue card and covered it with one of the papers in the pad.

I made up 4 flowers and cut some leaves out of green card.

I added them to the dividers in the card and added a large sentiment from the kit to the front and a small banner sentiment from the kit to the back wall of the box.


Of course these flowers could be used on all sorts of projects, they are so much fun.

You can find the kit in the Fruit Pixie shop here - 
http://www.thefruitpixie.co.uk/craftwork-cards-8-x-8-collection-pack-scrumptious-25687-p.asp


Friday, January 20, 2017

Perpetual calendar

   I always find that after Christmas I want to work with some bright colours and this kit from Craftwork Cards and available from The Fruit Pixie online shop, is just the ticket for that. The kit has the usual beautifully designed 8x8 papers in a pad plus die cut toppers. With each of their kits they like to chop and change about with the die cuts and  this time there are die cut flowers. Then of course you get the pack of their Candies, which if you have not come across them before they describe them as brads with out the prongs. So basically a  small 3d domed circle.

 Now I have to confess I am terrible with numbers, especially remembering then. I never know what the date is, never have been able to remember it and I am also almost as bad on the day too, ever since Hubby has taken early retirement. So when I saw this perpetual calendar in the Silhouette design store I thought it might solve the problem so I had to make one.


The calendar was cut on my Silhouette Cameo, an electronic cutting machine which I love.
I made it up in white card then covered it with the beautiful Craftwork Cards Scrumptious papers.


As you can see they all work very beautifully together, as we have come to expect from Craftwork Cards.


Not a very exciting photo I know but I wanted to show there are plainer papers too in the kit.

This is a lovely bright kit. Even though it has quite a lot of pink in it I wouldn't say it was too girly as the browns and blues give you different options for colour combinations.

You can find the kit in the Fruit Pixie shop here - 
http://www.thefruitpixie.co.uk/craftwork-cards-8-x-8-collection-pack-scrumptious-25687-p.asp


Friday, January 13, 2017

Winter birthday cards

Hello and a very Happy Crafty New Year!!      I am so pleased to be back in my craft room again after a busy Christmas time then a horrible cold but I am feeling better and excited about all the new crafty goodies that will come our way this year.     First though a bit of a look back to the Craftwork Cards Winter Forest paper pack available from The Fruit Pixie online shop. Now I have 2 family birthdays in December. So I made these cards for them using the Craftwork Cards Winter Forest paper kit. As you can see there is nothing remotely Christmassy about them and they look beautiful as Winter birthday cards
My first card is using one of the toppers in the kit mounted on some of the paper from the paper pad. 
The card base is covered by another of the papers in the paper pack.
I then used one of my punches ( I have a bit of a thing for snowflakes ) to punch some borders from the same paper as the topper mount.
Then I added a happy birthday to finish!
 
 
Now for the second I used a shape card cut on my Silhouette Cameo 
 
 
I used the beautiful snow paper from the paper pack to cover the sides and bottom pieces.
The owl is printed on the paper in the paper pack so I just cut a piece that included him to fit on the middle piece of the card.
Then I added some die cut snowflakes and another Happy Birthday and it's finished.
      So as you can see just because you have used a kit for Christmas cards they can be used for other cards too.       You can find this kit and many other wonderful things in The Fruit Pixie here -                      http://www.thefruitpixie.co.uk/craftwork-cards-8-x-8-collection-pack-frozen-forest-26360-p.asp  

Monday, December 19, 2016

Craftwork Cards Magic of Christmas paper Christmas house


Hello and welcome to my last Christmas post before Christmas. I'm design elf Katrina, I have the amazing job of showing you what you can make and do with the wonderful products the Fruit Pixie sells.    Christmas is just days away now and I thought it would be nice to show you a little house I made using the beautiful Craftwork Cards Magic of Christmas paper kit. I love to make these houses, in fact I have a whole village of little glittery houses that comes out at Christmas and has lights in them to light up their windows. You can buy battery operated LED lights now on the high street that make you houses look magical.     
I cut the base of my house using my Silhouette Cameo but you can find templates to print out free on the internet and you can also buy dies these days to make beautiful little houses.

The way I make my houses is to cut the base in plain card stock then cut the same again in the paper you wish to cover it with. I cut the constitution tabs off of the paper cuts and also cut along the fold lines as it's easier to cover your folds with ink after then get paper to curve neatly around a corner. I always decorate the house flat, then when you are happy with the look construct your house.

 To make the window frames I cut the house again in white card then cut the windows out leaving an even frame around them and  stick them to the house, then fold it up.


Don't forget the door knob, I used a sticky gem.


Also you can decorate the back too, I chose not to for this house.

The roof can be covered with a different paper to the walls. It can also a great place to add lettering or sentiments  too.


Of course no Christmas house could be complete without snow and sparkle. 

All this house needs now is its lights. You can use the battery tea lights but I find they are not strong enough to light my houses up so I use the battery operated fairy LED lights. Of course I don't need to tell you but for safety DO NOT USE A REAL CANDLE OR TEA LIGHT! 

These would be such fun to make with children, I would cut out all the pieces in different colours and paper then let them build up their own Christmas house. Great for a Christmas Eve activity.

Well there we are, my last Christmas post for 2016.

Can I take this opertunity to say a big thank you for reading my posts this year and wish you a very happy Christmas.

Join me after Christmas for more fun with paper, card, paint and ink!

Happy Christmas!
               Love Katrina 


Friday, December 09, 2016

Craftwork Cards Frozen Forest Christmas decoration

Well, our tree is up and decorated and it is really looking like Christmas is on its way!    Today I have a lovely Christmas tree decoration I have made using the Craftwork cards Frozen Forest kit. The toppers are perfect to make this decoration with. The plastic baubles are available on the high street, I got mine in Wilkinsons.  
I chose 2 of the toppers, one of the animal ones then for the reverse I have one of the sentiments. I cut them out with one of my dies and then stuck them together.
 
 I then put some of the beautiful Cosmic Shimmer Ice crystals to look like snow onto the flat topper. Then, keeping it flat, I stuck one half of the plastic bauble to the front of the topper using a wet glue and left it to dry.
 
Repeat for the other side, making sure the baubles hanging holes match up.
 
 
I added some wire worked onto a loop, a bow of ribbon and Christmas embellishment.
 
I also made a box using the same papers so I could give it as a gift.
 
Do have a look at this beautiful paper pack. You can find it in the shop here -
 
http://www.thefruitpixie.co.uk/craftwork-cards-8-x-8-collection-pack-frozen-forest-26360-p.asp
 
The Cosmic Shimmer ice crystals here -
 
http://www.thefruitpixie.co.uk/cosmic-shimmer-glitter-jewels-iced-crystals-19428-p.asp


Friday, December 02, 2016

Frozen Forest Christmas card

Another Christmas project. This time I am using the Craftwork cards Frozen forest collection available from The Fruit Pixie. This would work wonderfully well if you want something, like me, that would make seasonal Christmas cards but you also have winter birthdays to make for too.      The kit has the usual contents. A beautifully designed paper pad that is 8x8 and matching toppers. This time round ones with animals and scripted sentiments and some lovely pennant shapes too. Of course it also has the signature Candi, these are a pearl white.     I always find so many things to do with these Craftwork cards kits and this is no exception. So to start with I have a Christmas card to show you.
I have cut the card blank on my Silhouette Cameo but the sweet deer topper and striking black backing paper is from the kit. I just needed to add some snowflakes ( don't ask me how many different snowflakes I own but I have a HUGE amount but I will deny everything 😄 ) And then of course add a Happy Christmas to finish off.

You can find this beautiful kit in the shop here 
http://www.thefruitpixie.co.uk/craftwork-cards-8-x-8-collection-pack-frozen-forest-26360-p.asp


Friday, November 25, 2016

Sparkle Christmas card and stamping and embossing help

Here is my beautiful sparkling Wreath card using the lovely stamp by Woodware that I have designed for The Fruit Pixie. The stamp is a clear cling stamp so you will need a clear block to attach it too. These blocks are re usable so you only need to buy them once. You then take the clear stamp and peel it off the packaging and attach it to you block. Place your block on a level surface, stamp side up and apply the ink evenly across the whole stamp using light taps. You should always apply the ink to the stamp, don't push the stamp into your ink pad or you will just end up with an inky mess and you will wast a lot of ink.   Then turn your stamp over and gently press it onto your card. Always keep one hand in the middle of the stamp block at all times to stop it rocking. Gently press over the whole stamp to push the ink onto the card, you don't need huge pressure or you will squash you stamp and the image will be blurred. Small stamps don't need as much pressure as large ones. Each stamp is different so I always try out a stamp on scrap paper to see how much ink and pressure you need to get a good image before I apply it to my project.  If it's the first time you have stamped I would recommend stamping on a separate piece of card to your project and then cutting it out, either as a topper or cut around it, that way if it doesn't quite go to plan you have not spoiled a card you have worked for hours on. The more you stamp the more confident you will get.  The great thing about clear stamps is you can see through them so you can place them exactly where you want them. After stamping wash them in soapy water and leave them to air dry or use a stamp cleaner. Once dry put them back on the packaging and keep them in a cool dark place. If your ink has stained your stamp don't worry this happens, they will still stamp well. Once you have mastered stamping you will want to have a go at heat embossing, which is what I have done on my card.

To heat emboss you will need an embossing ink some embossing powder and a heat gun. For this card I have used a red tinsel embossing powder I have had for about 15 years or more so the powder will never go off!

To heat emboss you ink up your stamp with an embossing ink and stamp onto your card. Then cover your stamped image in your embosssing powder as you used to do glue and glitter as a child. It's a good idea to have a scrap piece of paper under your project so you can pour the excess powder onto it then back into the pot. You will notice just how little you will have used. Give the card a good few taps to get the excess off the card. If you have trouble with  embossing powder sticking to other areas of you card try wiping an anti static bag over your card before you stamp, it really dose help.

You then need your heat gun. Now they may look like a hairdryer but they don't blow like a hairdryer and get much hotter. If you use a hairdryer you will just blow all the powder off your card, nothing else. Now as I said the heat gun dose get hot so if your card is small you might want to hold it using a peg so you don't burn you fingers and of course don't let children do it. 

Turn your heat gun on and let it just run for 10 seconds or so to get hot, every heat gun is different and you will get to know yours. Once it is running hot hold it over a part of your image and wait for it to melt, it won't take long and once it has melted to a smooth surface immediately move on to the next bit. Keep going until it is all melted to a smooth shiny surface. Don't keep it on a melted part or it will melt into the card and don't wave it over the image or it will not melt evenly. Leave to cool before you touch it. If you find places where it hasn't melted then just go back in and melt it down.

This process is mesmerising, no matter how many hundreds of times you see it happen it is still magic!

So perhaps have a go at stamping or embossing if you have never tried it before it dose open up a whole other world. Or if, like me you haven't done it for a few years, get out your embossing powders and play with them. 

You can find all you need for you card in the shop 

The Woodware Berry Wreath stamp -
http://www.thefruitpixie.co.uk/woodware-clear-magic-stamp-berry-wreath-26345-p.asp

Acrylic blocks -
http://www.thefruitpixie.co.uk/acrylic-block-5-x-3-12-10780-p.asp
http://www.thefruitpixie.co.uk/acrylic-block-6-12-x-5-10776-p.asp

 Embossing Ink for you stamp -
http://www.thefruitpixie.co.uk/embossing-inks-407-c.asp

Embossing powders -
http://www.thefruitpixie.co.uk/cosmic-shimmer-embossing-powders-312-c.asp

An anti static bag wiped over the card before you stamp and add you embossing powders really dose stop the powder from sticking where you don't want it, so only on the ink!
http://www.thefruitpixie.co.uk/woodware-magic-anti-static-pad-23796-p.asp

If you have any questions about stamping and heat embossing please ask me, either by email or here or on The Fruit Pixie face book page and I will do my best to help.

.        

Tuesday, November 22, 2016

The magic of Christmas card

    The Fruit Pixie, who I design for has a lot of wonderful Christmas dies and I have used one of them from Couture Collections and Spellbinders to make this cute card. The merry Christmas die is one of my own.  
The base for this card was cut on my Silhouette Cameo but you could quite easily use a standard card base and get the same effect.   The background paper is from the Craftwork Cards Festive Chalkboard paper pack.         To give the buildings their glow I cut the die out in grey card then using scraps of yellow and orange card I stuck each piece to each individual building and trimmed the coloured card down. I then used my clear glitter pen to give it some sparkle. For Father Christmas I cut in once for the base colour in red then just covered the specific areas with the corresponding coloured card. So brown for the reindeer, gold for the sleigh runners etc then trimmed the and glued them to the respective places. It sounds a lot of work and I admit you wouldn't want to make 100 of them but it is enjoyable and looks great in the end. You can find the thing I used in the shop here - Sizzling house die - http://www.thefruitpixie.co.uk/spellbinders-die-row-houses-23756-p.asp. Father Christmas die - http://www.thefruitpixie.co.uk/couture-creations-dies-649-c.asp Craftwork cards Festive Chalkboard paper pack - http://www.thefruitpixie.co.uk/craftwork-cards-8-x-8-collection-pack-festive-chalkboard-25677-p.asp  
     

Saturday, November 12, 2016

Bicycle birthday card

    I know we are rushing towards Christmas at what feels like top speed but I thought I would just stop to take a breath and make some cards using the Craftwork Cards Blackboard set before I start on the Christmas ideas.

   This is another great set from Craftwork Cards this time using a black background throughout. Now I don't use black really in my crafting but they released a Blackboard Christmas kit last year and I must admit I really enjoyed using it and the cards look lovely. So do give this kit or the Christmas one which is available in the shop too, a try they do make beautiful cards and, as all Craftwork cards kits, are so easy to use.

   This kit is the same as the others with a pad of papers, die cut toppers and a bag of their Candis

 For my first card I chose the bicycle paper in the pad. Their papers are designed so well, you can use the image on the paper by itself, as I have done here and there is still plenty of the paper to use in another project.


As you can see there are lots of other pastel colours you can use to compliment your image, I chose the soft duck egg blue from the Core-dinations range.


I chose one of the backing papers and backed it with the same colour Core dinations card.


Another of the papers in the pad has lots of little icons you can cut out and layer.


Then to finish off I used one of the die cut sentiments in the corner.

Add some spots of glitter pen and some shine on the berries using the a glaze pen and you are done.

You can find this kit in the shop here - 
http://www.thefruitpixie.co.uk/craftwork-cards-8-x-8-collection-pack-chalkboard-25681-p.asp

The Christmas version here - 
http://www.thefruitpixie.co.uk/craftwork-cards-8-x-8-collection-pack-festive-chalkboard-25677-p.asp

You can find ideas for using the Christmas version of this kit here - 
http://thefruitpixie.blogspot.co.uk/2015/11/chalkboard-christmas-cards.html
and 
http://thefruitpixie.blogspot.co.uk/2015/11/festive-chalkboard-christmas-countdown.html
and here - 
http://thefruitpixie.blogspot.co.uk/2015/12/craftworkcards-festive-chalkboard-from.html

The Core Dinations card here - 
http://www.thefruitpixie.co.uk/coredinations-super-assortment-nostalgia-15491-p.asp

The card bases here - 
http://www.thefruitpixie.co.uk/50-craft-uk-6-x-6-card-blanks-white-14478-p.asp

 Hope you like this card and have a look at the kits, they are something different to play with.


Wednesday, November 02, 2016

Something Wicked art journal

This year on the AJC ( Art Journal Caravan ) we had a Halloween journal to work in on the days leading up to Halloween. There was a challenge for each day with something to either use in your page, like a quote, or inspire you to write in your journal. Here in the UK Halloween has only taken off in a big way in my adult life so having no real childhood memories to journal about, plus I was away in Vienna for a week of it so had limited equipment to play with, I mainly chose the quotes and arty challenges to do. I also picked and chose my challenges rather than doing them in order use to being on holiday.  The Journal itself I made using watercolour paper for the pages and then a stif card to form the covers.    So here is my finished journal - 
This was my front cover, we had a few titles to chose from. I used my Silhouette Cameo to cut the letters
 
 
                              Page 1 is one of the poems given to us all hand lettered and then filled in using die cut bats and stars.  
                        Two challenges here. My potion for happiness and then on the right another saying all hand lettered   
                       The page on the left is an altered photo made into a witch,on the left another saying hand lettered with a lovely         witch cut with my Silhouette Cameo   
Now this was such fun, we had to write a story and then insert icons now and again. I used to love these as a child!
 
 
Another hand lettered page using die cuts I did using my Silhouette Cameo.


For the page on the right we had to use a reverse stencil. So I cut a 13 out with my Cameo and the put it on my page a used spray inks and then added to it using crayons.
The right page's challenge was you favourite Halloween film. One of mine is, as you can see, The Fearless Vampire killers which is a really funny film.
 
 
Then the last page, the challenge was a quote from Poe, of course it had to be The Raven. How can you possibly have Halloween without The Raven by Edgar Allan Poe.  
 
Then the back cover. The 31 is the 13 I used as the reverse stencil switched to make 31.
 
I think you can see how much fun I had working in this journal. The Art Journal Caravan is full of gems tike this so do have a peek at it if you want to journal but are not sure how to start or want something a bit different to do in your journals.
 
                                                                        http://shoptangiebaxter.com/

Sunday, October 30, 2016

Halloween Frame

 A very Happy Halloween! Today I have a mixed media frame to show that I have made for The Fruit Pixie using the new Halloween stamps from Stampendus and the MDF frames from Creative Expressions.


         I decided to colour her using paper piecing. For those who don't know paper piecing is, it's a way to colour your stamped image by using different papers. So for this image I stamped the image to a skin coloured card then I stamped her again onto a purple paper and cut out just the coat part of the image. I then stuck it to the skin coloured image. She then had a purple coat. You keep doing that onto different papers or coloured card until you have the effect you want. A small sharp pair of scissors really help with this.

    Once I had complicated the girl I cut her completely out from the background. I still wanted her on her background so I stamped it again but this time I cut away the Halloween word. This was because I wanted to make the whole image fit in my frame and it was a tiny bit too big. So I stuck the Halloween word back onto the background to make it fit into the frame.


    I then painted my MDF frame with black paint and using some of the Creative Expresions waxes to highlight some of the areas.

 I then took my PVA glue and drew some swirls with it over the frame. Then before it dried I tipped some Frantage black glass glitter over the top.

Once it was all dry I could stick my stamped image to the backing of the frame and the stick the frame over the top.

         There, all done and ready for Halloween.

                        You can find the stamps in The Fruit Pixies Etsey shop -  https://www.etsy.com/uk/listing/470878048/haloween-sprite-cling-stamp-pixie-elf?ref=shop_home_active_51          

                                    You can find the MDF frames here
 - http://www.thefruitpixie.co.uk/creative-expressions-mdf-690-c.asp

                                    You can find the wax here -
          http://www.thefruitpixie.co.uk/creative-expressionscosmic-shimmer-gilding-wax-678-c.asp

                                       and the glitter I used here -
http://www.thefruitpixie.co.uk/frantage-crushed-glass-glitter-black-18299-p.asp


Thursday, October 27, 2016

Halloween card

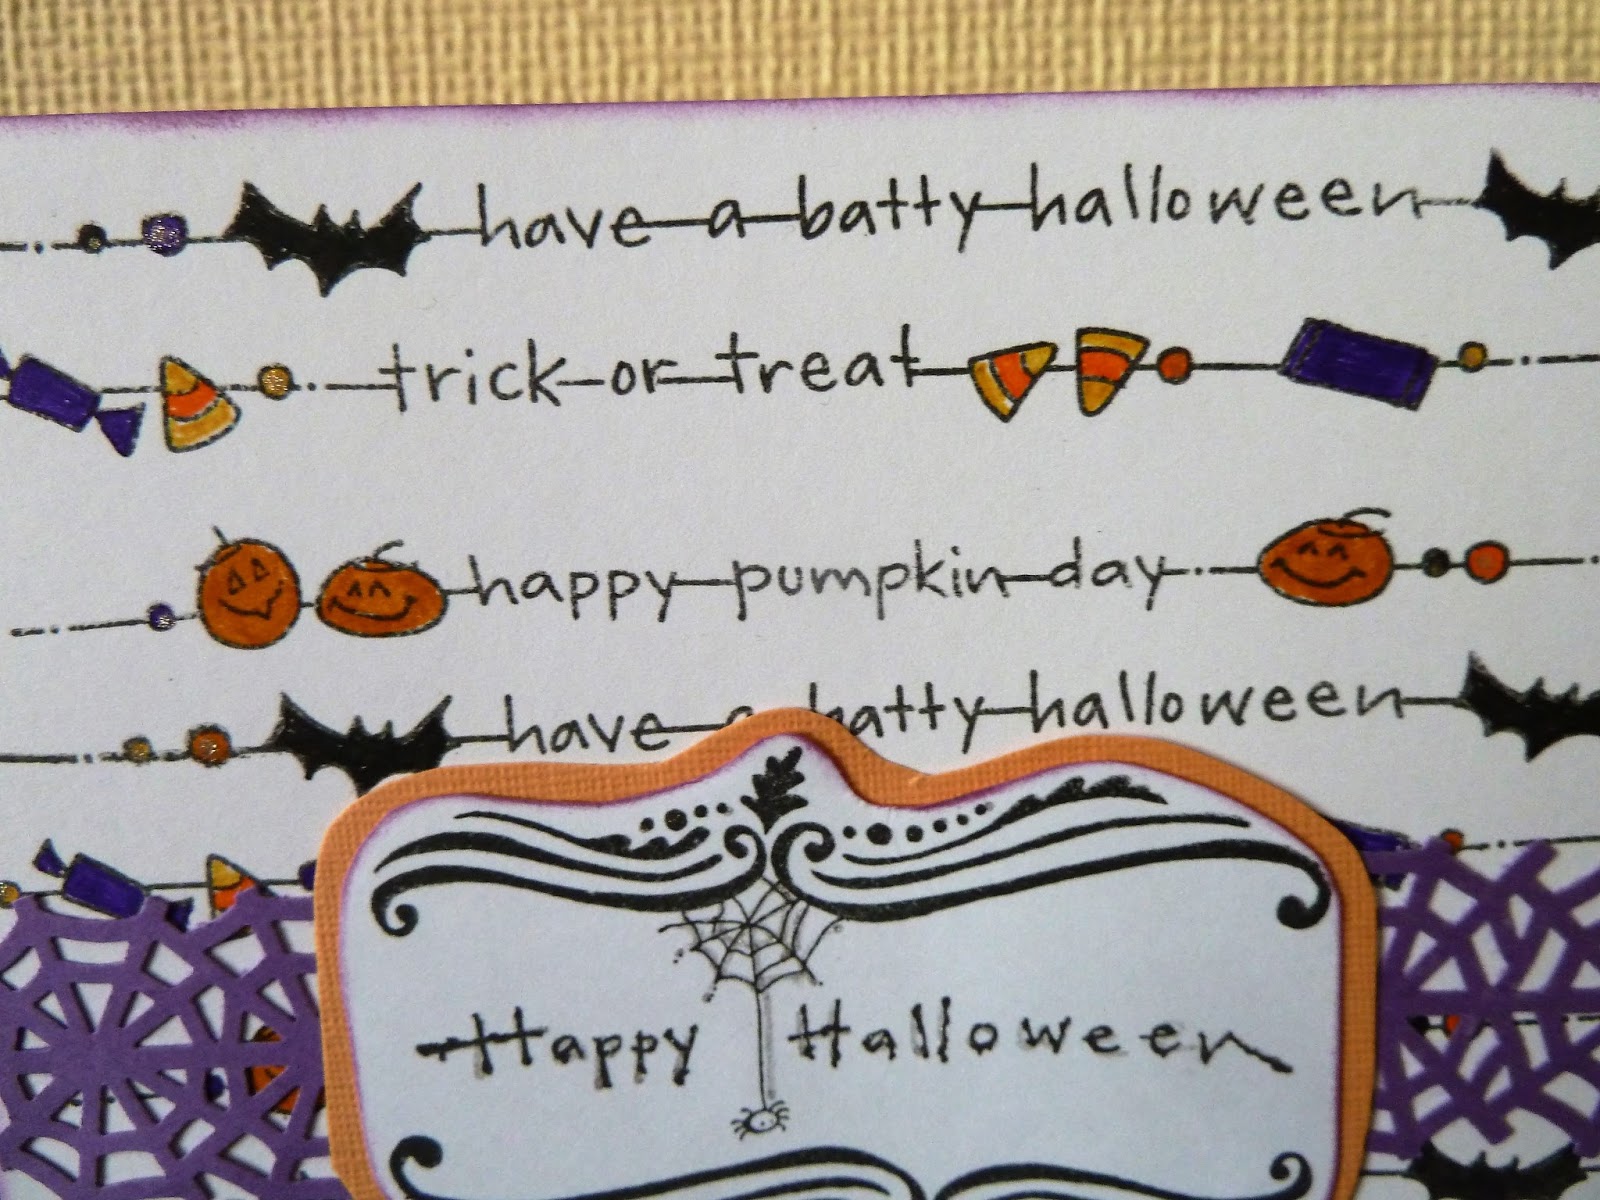
The Fruit Pixie who I proudly design for had some lovely new Halloween stamps in. I started using the Stampendous Halloween Chains and the Halloween Brackets to make this card

 I love these new stamps by Stampendous! They stamp beautifully and I find stamps like these really handy to have, you can use then on the card as I have here or inside as well. They would also look cool around the address on the envelope or to make Halloween party invites. Because they are neither for girl or boy they have so many uses. They would also be really handy for scrapbooking or project life.


I took 5 inch square card in white. I then put the 3 stamps ( all the stamp strips are separate ) onto my block, you get 4 stamps but the other stamp has a little spider on it and is made to be used virtually. I stamped them 4 times and then coloured in the little icons. 


The purple card spider webs were punched out using a Marther Stewart punch. 

The sentiment stamp is the Stampendous! cling Halloween Brackets stamp which I stamped onto white card and cut out. I then stuck it onto orange card and cut it out again leaving a small amount of the orange card showing.

To finish the card off I added some dabs of my glitter pen and sponged some purple ink around the edge.

There we are, quick easy and fun but still a stylish card to send out.
You can find these stamps and much more at The Fruit Pixie - 
http://www.thefruitpixie.co.uk/


Sunday, October 09, 2016

Colourful bunting

I have been making bunting as a project for The Fruit Pixie. All the products, except the large letters, are available through The Fruit Pixie shop.


    For the base of my bunting I used the Creative Expressions MDF Bunting which I then covered with the papers and words from the Craftwork Cards Bohemian Dreams.

   Here is a close up of each piece of bunting -


I made up 2 rosettes which I made in the same way as I showed on the post for the Craftwork Cards Rosette cards and added buttons to them. The rose and stamp are from the Craftwork cards Bohemian paper pack as is the butterfly. The dots are Craftwork cards Candis.


As you can just see on this one I painted the sides some of my bunting with a red paint, others in blue. I then covered it with paper from the Craftwork cards Bohemian Dreams. The large letters are chipboard ones I have had for years at home which I painted . I cut hexagons using a die out of the different papers in the Bohemian Dreams paper pad and added a stitch look with a fine liner pen. The words are also from the paper pad as is the little stamp. I then added buttons and a lemon Dahlia cabochon along with some more of the Candis.


Here are more of the papers cut into hexagons along with some more of the collage pieces and words, also from the paper pad. I also used a button and this time a blue Dahlia cabochon.


On this one you can see the stitching I drew around the hexagons I cut from the paper. I also used more collage bits and words found in the paper pad as well as a lime Dahlia cabochon and some more of the Candis too. 


Much the same was used again, paper from the paper pad, buttons and Candis and this time a white Dahlia cabochon.


For the final piece of bunting I again used paper from the pad to make the rosettes, a butterfly from the kit too as well as some of the collage pieces cut from the papers and a few Candis. 


To thread the bunting together I used several ribbons that matches the colours of my bunting to give it a festival look. It hangs in my craft room by the window and the ribbons flutter nicely in the breeze.

This is a lovely project to make and I think these papers really lend themselves to it with their bright cheery colours. The pad also has lots of lovely words that also worked so well with this project.

You can find the papers I used here - 
http://www.thefruitpixie.co.uk/craftwork-cards-8-x-8-collection-pack-bohemian-dreams-25673-p.asp

the buttons here - 
http://www.thefruitpixie.co.uk/button-assortment-brights-9821-p.asp

the Dahlia Cabochons here - 
http://www.thefruitpixie.co.uk/beads-76-c.asp

All sorts of ribbon here - 
http://www.thefruitpixie.co.uk/ribbons--trims-ecfb8nproducts179curpage-2-179-c.asp