
Friday, December 14, 2012
Rosette Christmas decoration
I made this cute little decoration with the off cuts from the Ruby Rock Christmas journal. I scored and folded a 12x2 strip of the Ruby Rock it paper using the Hougie board and made it into a rosette. I then used one of the borders from the Ruby Rock it Joyeux Noel borders set and some bakers twine to finish it off. All these products are available from the Fruit Pixie where I am proud to be their design elf!!

Gift card holder idea
I must admit it was M&S that gave me this idea and I know that the Woodware Cd Sleeve available from The Fruit Pixie would make the perfect base for this gift card holder. I also used a small coin envelope to hold the gift card. The paper and the lovely glittery angel came from the Ruby Rock it Joyeux Noel paper range also available from the Fruit Pixie.


Add a piece of card with your Christmas message on a piece of card inside the CD Sleeve and then pop your gift card inside the little envelope and your ready for the big day!!
Little altered Reindeer

Thursday, December 13, 2012
Ruby Rocket Christmas journal
I have had my Fruit Pixie designer elf hat to make this Christmas Journal using the Ruby Rocket Joyeux Noel papers and a Kanban mini album. These papers are a dream to work with and gives you such a wonderful vintage look. The Fruit Pixie has everything you need to make this journal.
.JPG)
.JPG)
.JPG)
.JPG)
.JPG)
.JPG)
.JPG)
.JPG)
.JPG)
.JPG)
.JPG)
.JPG) and then this to finish off.
and then this to finish off.
.JPG)
.JPG)
.JPG)
.JPG)
.JPG)
.JPG)
.JPG)
.JPG)
.JPG)
.JPG)
.JPG)
I added an envelope to the back cover to hold tags and bits and bobs.
.JPG)
Friday, November 30, 2012
A few quick Chtistmas cards
I have been making a few quick Christmas cards using the Craft UK Die Cut Collage Sheets available from The Fruit Pixie. These sets are such good quality with a sheet of foiled toppers and a sheet of matching card in each pack. They are ideal for quick cards and, as you have seen, lots of other projects too.
.JPG)
.JPG)
.JPG)
.JPG)
.JPG)
.JPG)
This simple easel card used Craft UK Die Cut Collage Sheet Pinecone Scroll
.JPG)
Instructions for this stepper card come with the Hougie board and I used the Craft UK Die Cut Collage Sheet Frost & Feathers to make it
.JPG)
This is such a simple card but so Christmasy. I used Craft UK Die Cut Collage Sheet Snowfall which has the most delightful images in the collection of toppers.
.JPG)
For this card and sweet little box below I used Craft UK Die Cut Collage Sheet Robin on a Perch The card in these kits is such good quality it makes boxes easily. I chose to put the robin design inside the box and inked the outside with Tim Holtz Distress Ink Pad Fired Brick. The card took it beautifully.
.JPG)
Of course all Christmas things have to have glitter and the best glitter glue I have ever used is Imagination Crafts Magi Glitz Gel - Arctic Frost which I have used on all the projects above. If you have never tried it then give it a go, I don't think you will be disappointed!!
Thursday, November 29, 2012
Christmas tag
This tag is very much a happy accident. I needed to make a very quick tag and meant to reach for my Alterations tag die but instead I had pulled out my Alterations labels die, I was about to put it back when I thought " actually, why not" and put it through my Cuttlebug with some of the Coredinations card and then an embossing strip. I sanded it off and used the Dust Buddy for the first time ( feels very, very odd but dose a brilliant job, if you haven't tried one yet give it a go) You can get all these products at The Fruit Pixie. I must admit I loved the result!


So, next time you want to reach for your favourite die, think again and try something new. Accidents don't always work but is such fun when they do!!
Art Deco Birthday card
Here is the card I have made for my Uncle for his Birthday this weekend. He loves anything made on my Cricut machine, my Uncle and my Grandad were always making or mending things in their day, so a machine that cuts by itself amazes him, as it dose me! So I have used my Art Deco cartridge to make this scene card, the road part of the card opens so you can write inside and stand it up.


Monday, November 26, 2012
Altered Christmas window book
Here is my new Christmas kit available now from Altered Pages. You will get my full instructions with photos, collage sheets, German scrap, glitter glue and embellishments in the kit. All you need to add is your book to alter and I also talk you through choosing that.


Just a sneaky peek inside to give you a taste of whats inside. This will be my last kit for Altered Pages as I have decided to stand down from their design team, after over 3 years and move on to new adventures, what ever they many be.
Sunday, November 25, 2012
Christmas lanterns
I have been working again with Craft UK Collage topper sheets, I used Joy this time.
.JPG)
.JPG)
This little lantern to use with a tea light but please be careful, is really easy to make and only uses 1 sheet of card for the lantern itself.
So take the backing card and cut it down to 51/2 x 10 3/8. The place it on the Hougie board and score at 2.5, 5, 7.5 and 10. Then turn the card around and score a line at 1.5, this will be the bottom of the lantern so if you are using a pattern with a top and bottom this needs to be at the bottom. You then need to cut the scored lines up to the 1.5 line you have just scored.
Now to cut the apertures, use any shaped die that will fit in the panel and cut them out. Place velum on the back of each aperture. Choose the images you like from the toppers and cut them out. I used a little snowflake punch to punch out snowflakes from the waste twinkly card. Fold up your lantern and glue together. Add your images and embellishments and you are done.
.JPG)
.JPG)
This little lantern to use with a tea light but please be careful, is really easy to make and only uses 1 sheet of card for the lantern itself.
So take the backing card and cut it down to 51/2 x 10 3/8. The place it on the Hougie board and score at 2.5, 5, 7.5 and 10. Then turn the card around and score a line at 1.5, this will be the bottom of the lantern so if you are using a pattern with a top and bottom this needs to be at the bottom. You then need to cut the scored lines up to the 1.5 line you have just scored.
Now to cut the apertures, use any shaped die that will fit in the panel and cut them out. Place velum on the back of each aperture. Choose the images you like from the toppers and cut them out. I used a little snowflake punch to punch out snowflakes from the waste twinkly card. Fold up your lantern and glue together. Add your images and embellishments and you are done.
Thursday, November 22, 2012
Christmas heart box
I have been playing with the Craft UK collage sheets from The Fruit Pixie for this idea.
They come with diecut toppers and a sheet of extremely good quality cardstock that matches the toppers. I have so many ideas for what you can make with these I must remember to make some cards too.
This little hanging heart box is easy to make. I drew a heart shape and cut it out twice. Then to make the box sides I cut a strip of card about 2 inches wide and then score 2 lines down the length of your card then fold in half horizontally to fit in the bottom of your heart. To make the point cut along the half fold to the long fold lines, fold it up and stick to one side of the heart then stick the other heart on top, add your topper and embellish. Add something to hang it up and fill it with goodies.
.JPG)
.JPG)
Hope you like it, please visit the Fruit Pixie for lots of Christmas joy!!
Wednesday, November 21, 2012
Christmas tags
I was thinking, why not give everyone a little piece of you with their Christmas pressie this year by making them their own individual tag. They don't have to be elaborate creations that takes you days to create but just a little piece of your own style art in the form of a tag like these ones I have made here using scraps of last years papers and the wonderful Altered Pages collage sheet called Betty Bonnet Christmas.
.JPG)
.JPG) Its a sheet of paper dolls with Christmas outfits, which I have dressed them in. Great fun that really took me back to my childhood as I used to love paper dolls, and still do. I made 4 tags with this sheet but you could make a few more if you wanted to.
Its a sheet of paper dolls with Christmas outfits, which I have dressed them in. Great fun that really took me back to my childhood as I used to love paper dolls, and still do. I made 4 tags with this sheet but you could make a few more if you wanted to.
Why not pop over to Altered Pages and take a look at the huge amount of collage sheets they have for every occasion!
.JPG)
.JPG)
Why not pop over to Altered Pages and take a look at the huge amount of collage sheets they have for every occasion!
Thursday, November 15, 2012
Thought I would do one more normal project for The Fruit Pixie before I got in to full Christmas mode.
As soon as I saw the new 7Gypsies papers The Fruit Pixie has I just couldn't wait for them to arrive, this one is the Trousseau collection. The trouble is they are just too nice to use really but I took 2 pieces of the double sided paper (I used Dearest and True ) and the lovely stamp set to make this collage piece.

It is made using grey board as the base, I then collaged using the papers, painted the sides and added some colour with paint. I added a few buttons from The fruit Pixie Button Assortment Vintage to finish it off. Family was written using die cut letters but you could use stamps or stickers instead.
Sunday, November 04, 2012
Phone charms are not just for phones
I have been itching to use these cute Oriental Porcelain God Beads ever since they came from The Fruit Pixie, who I am very, very proud to design for! I love to use the phone charm clips, also available from the Fruit Pixie, to identify which memory stick is which. I have several with different thing on and it is so annoying when I want a certain digi kit to load up the stick with my collage sheets on! So they all now have their own charm.
.JPG)

The 2 God bead ones made using paper beads form the scraps of the last Ruby Rocket kit which went so well with them. Andrew has claimed the red one for his stick.


.JPG)
The Inspire one was made using one of the word tiles and a couple of beads

The 2 God bead ones made using paper beads form the scraps of the last Ruby Rocket kit which went so well with them. Andrew has claimed the red one for his stick.


Then lastly the blue disc one which I made from the Ultra thick melt pot session a couple of months age.
Everything to make these are available from the Fruit Pixie, they are such fun to make and have endless possibilities and places to hang then, not just on your phone!
Wednesday, October 31, 2012
Happy Halloween
Happy Halloween! I want you to meet Mr Bones, I bought him at the pound shop with his mate who is a Mummy and still waiting to be transformed poor chap, as soon as I saw them I knew what I wanted to do with them. So here he is, covered in book pages then paint. I made his hat using my Nestabilities and decorated it with the fence and bats from the new Sizzix Halloween long die, then dressed him up in colour and cuffs and a felt tie. I think he looks quite dapper!
.JPG)
.JPG)
.JPG)

.JPG)
.JPG)
.JPG)
One last quick Halloween decoration I made yesterday was this little band to go around a tea light glass holder. I used the Tombstone die from Quick kutz and the skeleton from Sizzix to make this cute decoration.
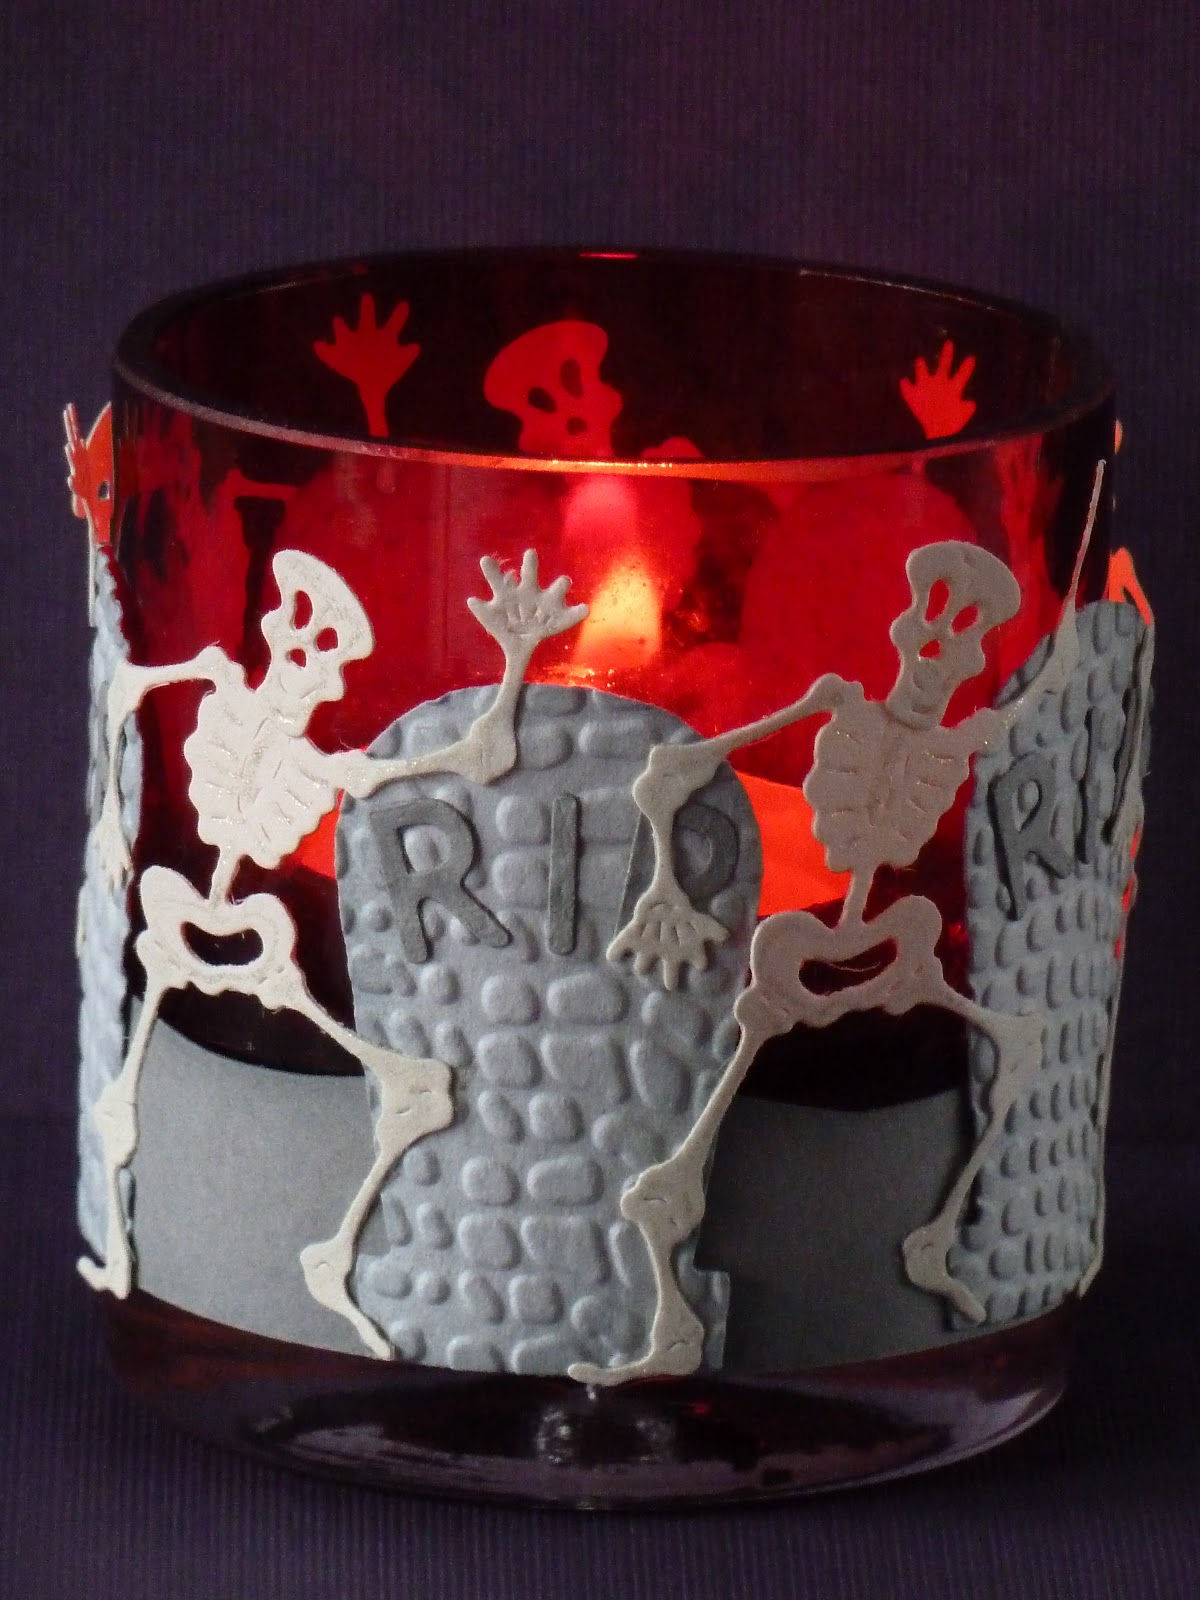
Have a fun, happy and safe Halloween!
Tuesday, October 30, 2012
Eat cake birthday card
Last week it was my Sisters Birthday. Hubby wanted me to use a photo he took of her a few Christmases ago. I made sure she knew it was his idea!! hehehe


I loved the 50's look of the digi kit I used, although the card is all made using hybrid crafting ( printed elements from a digi kit, then cut out and collages by hand ) So I carried it through the wrapping and then made a money holder for her Birthday money.


Wednesday, October 24, 2012
Halloween cushion
For my Altered Pages blog post this week I had wanted to make something a bit different. I always seem to print my images out on paper but this week I wanted to make a little cushion. So after enlarging the image I wanted to use from the Altered Pages Wicked Witches collage sheet I printed it out onto printable cotton, made it up into a little cushion and added a pom pom trim. Quite cute!
.JPG)
.JPG)
Thursday, October 11, 2012
Halloween waterfall card
For my design team blog post for Altered Pages this week I have made a Halloween card using the very cute " Black cat or white cat" from the huge collection of Halloween images available from the Altered Pages web site

The little bat tiles lent themselves perfectly to the waterfall part of the card and to finish off I used my Mather Stewart punch and added a couple of bats!
.JPG)
.JPG)
Tuesday, October 09, 2012
Halloween Blog Hop winners
Thank you all so much for taking part in the Altered Pages Blog Hop and for all the wonderful comments you have left for me.
So, drum roll please...................
The winners of a free Altered Pages Collage Sheet are -
* A-Scrap-a-teeny-girl
* Nicle Ibarra
Congratulations to you both. You now need to go to the Altered Pages website - http://www.alteredpages.com/index.html and contact Jean the owner through an email with your choice of collage sheet and mention you are a blog hop winner from the Arty Parrot blog.
The winner of the grand prize, the scissor mouse is -
* Barbra Rankin
Congratulations Barbra, you completed the whole hop leaving comments and following every blog. If you haven't claimed your prize yet you also need to contact Jean through the Altered Pages website.
Thank you again to everyone who took part, I hope you enjoyed hopping and found some inspiration for your Halloween crafting.
Friday, October 05, 2012
Day of the dead fun
Hello and welcome to the Altered Pages Halloween/Fall blog hop 2012. Hope you are enjoying all the wonderful art that has been created by my fellow designers on the Altered Pages design team. Please make sure you read to the bottom of this post as I will be giving away a free collage sheets from Altered Pages and you will then be able to go on to have a chance of winning the grand prize a scissor mouse, so don't miss out!!
As you can see I decided to do something a little different for this hop and chose to work with the Day of the Dead collage sheet from Altered Pages, well who wouldn't want to work with these wonderful characters and using bright colours which makes a real change for Halloween. I also made a couple of cute little treat bag for the Halloween folks too.
For those who haven't come across Day of the Dead before, as far as I understand it, it is celebrated in Mexico and Spain on November 1st. It is a day to remember our ancestors and those who have recently died, visiting their graves and spending time there. Little gifts are bought for them and their graves decorated with flowers. They also build private alters in their homes and decorate them with marigolds and sugar skulls.
So here is my version of a Day of the Dead alter. I made it from scratch using old packaging card and decorated it with a brightish Halloween paper. I did make the image of the skeleton couple larger to fit my alter and added them as the main image. I then made some tissue flowers that I hope look like marigolds ( although my gardening hubby doesn't think so ) to decorate the alter.
.JPG)
.JPG)
.JPG)
These little bags were cut on my Cricut but you could make your own or use ones you have found in the shops. Altered Pages has lots of different Halloween images its difficult to choose but I chose these cat images from the Halloween Memories collage sheet.


OK now the important bit, PRIZES!! To be in with a chance to win a free digital Collage sheet from Altered Pages you need to leave me a comment on this post and become a follower of my blog. I will announce the winner on my blog next week.
For the Grand Prize - a free Scissor Mouse from Altered Pages ( http://www.alteredpages.com/shop/Tools/Cutting-Tools/p/Scissor-Mouse-Now-Here--click-here.htm )
1. You will need to begin at the Altered Pages Blog -http://alteredpages-artsociates.blogspot.co.uk/ Leave a comment there and become a follower if you are not already one. Then start to hop!
2. You must visit each blog in the hop and on each of the individual blogs you must leave a comment on the blog hop post and also become a follower of each blog as you go.
3. You must then finish back at the Altered Pages Blog and leave another post to say you have completed the whole hop. Your name will then go into a draw for the prize and the winner announced on the Altered Pages Blog.
Good Luck and enjoy the hop!
As you can see I decided to do something a little different for this hop and chose to work with the Day of the Dead collage sheet from Altered Pages, well who wouldn't want to work with these wonderful characters and using bright colours which makes a real change for Halloween. I also made a couple of cute little treat bag for the Halloween folks too.
For those who haven't come across Day of the Dead before, as far as I understand it, it is celebrated in Mexico and Spain on November 1st. It is a day to remember our ancestors and those who have recently died, visiting their graves and spending time there. Little gifts are bought for them and their graves decorated with flowers. They also build private alters in their homes and decorate them with marigolds and sugar skulls.
So here is my version of a Day of the Dead alter. I made it from scratch using old packaging card and decorated it with a brightish Halloween paper. I did make the image of the skeleton couple larger to fit my alter and added them as the main image. I then made some tissue flowers that I hope look like marigolds ( although my gardening hubby doesn't think so ) to decorate the alter.
.JPG)
.JPG)
.JPG)
These little bags were cut on my Cricut but you could make your own or use ones you have found in the shops. Altered Pages has lots of different Halloween images its difficult to choose but I chose these cat images from the Halloween Memories collage sheet.

OK now the important bit, PRIZES!! To be in with a chance to win a free digital Collage sheet from Altered Pages you need to leave me a comment on this post and become a follower of my blog. I will announce the winner on my blog next week.
For the Grand Prize - a free Scissor Mouse from Altered Pages ( http://www.alteredpages.com/shop/Tools/Cutting-Tools/p/Scissor-Mouse-Now-Here--click-here.htm )
1. You will need to begin at the Altered Pages Blog -http://alteredpages-artsociates.blogspot.co.uk/ Leave a comment there and become a follower if you are not already one. Then start to hop!
2. You must visit each blog in the hop and on each of the individual blogs you must leave a comment on the blog hop post and also become a follower of each blog as you go.
3. You must then finish back at the Altered Pages Blog and leave another post to say you have completed the whole hop. Your name will then go into a draw for the prize and the winner announced on the Altered Pages Blog.
Good Luck and enjoy the hop!
Subscribe to:
Posts (Atom)