Friday, July 29, 2016

Chemistry cards

  Now, I have lots of mens cards to make for our family, my sister has two teenage boys and as their birthdays come around I find myself searching for something I can use that they will like. The youngest, Luke had his birthday yesterday and as he is doing his A levels which include sciences, I thought these stamps and stencils from IndigoBlu from The Fruit Pixie would be perfect.

  I ended up making 3 different cards, all using everyday card blanks. I decided to use my Gelli plate to make the backgrounds using acrylic paint.

 For my first card ( and the card I ended up giving to Luke ) I used the IndigoBlu wierd science stencil for the boarders along the top and bottom. Then the IndigoBlu periodic table stamp to make the background.


The Albert Einstein quote came from the IndigoBlu Chemistry Lab stamp set which I stamped and then cut apart for the card.


The test tubes are also from the Cheistry Lab set which I have stamped onto card I have painted using my Gelli plate and cut out .


For the second card I used a DL card blank but have used it landscape instead of portrate. Again the base colour was applied with my Geilli plate.


I used the Wierd Science stencil to add the dotty border.


The stamp for the background was from the Chemistry Lab set.


I used the Periodic table stamp again stamped onto Gelli platted card. the little flasks were also stamped onto painted cardstock and cut out.


The final card, another 6x4 card blank painted using my Gelli plate.


I stamped the Periodic table onto the card.


Stamped the flasks onto 2 different painted card and cut them out compleatly from 1 of the card colours but only cut the liquid in the flasks out of the other so you could layer them to look like the flasks have liquid inasde


I then stamped the second quote from the Chemistry Lab stamp set, cut it apart and applied to the card to finish.

These stamps and stencils from IndigoBlu are so different, I really like them and think they are perfect for thoses sciency people in your lives.

You can find the stencil in The Fruit Pixie online shop here - 

http://www.thefruitpixie.co.uk/indigo-blu-stencil-weird-science-26201-p.asp

The stamps I used here - 

http://www.thefruitpixie.co.uk/indigoblu-rubber-stamp-plate-chemistry-lab-26171-p.asp

Card blanks here - 

http://www.thefruitpixie.co.uk/card-blanks-374-c.asp


Seaside Zine

As part of my design team duties for the Tangie Baxter and Co Art Journal Emporium I write a blog post each month. This month Tangie had this wonderful idea, members of the emporium would make and share little Zines with each other. I loved this idea and so wrote my blog post about my Seaside Zine.

  These little books are so easy to make and I had such fun making mine, all cut and paste work. I made the background using my Gelli plate. All the images are from Tangie Baxter and Co

  You can find out exactly how I did it with step by step photos on the Tangie Baxter and Co blog
here - http://shoptangiebaxter.com/blogs/news/oh-i-do-like-to-be-beside-the-seaside-zine-by-katrina-rollings

 Also information about the Art Journal Emporium, which is fantastic value here - http://shoptangiebaxter.com/

  Finally here is my little Zine -


If you like to art journal or would like to get started, I can recommend the Art Journal Emporium, I was a member for many years before I joined the design team and it really is lots of fun.


Friday, July 08, 2016

Tiney fairy book

 I have another little project to show you using the beautiful Graphic 45 Enchanted Forest paper collection and the sweet little Woodware Chippies Tiney books chipboard set I have made for The fruit Pixie online shop.

  Woodware Chippies are blank chipboard shapes you can paint or cover, depending on what you are making. I have used the Tiney books set, well half of the set, to make my little book.


For the base of the book I just covered the book pages, both sides, with some of the Graphic 45 Enchanted Forest background 12x12 paper and cut the ribbon slips. Remember to do this before you cover the reverse side or you will never find them!


I then used the images from the Dazzling Damsel 8x8 background paper to collage my pages.


All of the word strips are from the Gilded grandure 8x8 paper, as well as the cute little stamps on the front cover too. I believe in fairies is a stamp from the Enchanted Forest stamp set 1.


I then used some ribbon to compliment the book to tie it all together. 
TIP- For the ribbon ties, place a pencil on the ribbon before you tie the knot so you have room to turn the pages.


As you can see its a sweet little book and great fun to make.

You can find the Woodware Chippies Tiney books here - 
http://www.thefruitpixie.co.uk/woodware-chipboard-414-c.asp

Graphic 45 Enchanted Forest papers and stamps here - 
http://www.thefruitpixie.co.uk/enchanted-forest-696-c.asp

Ribbons here - 
http://www.thefruitpixie.co.uk/may-arts-ribbon-410-c.asp

I think this would be a great project for the children to make and the summer holidays are just around the corner too!

Sunday, July 03, 2016

Gift money envelope

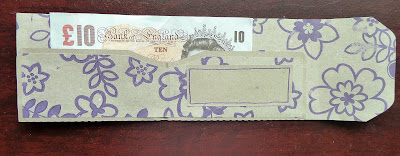
 Here is my latest project for the Fruit Pixie, who I design for, using the Payper Box Kraft Paper collection.

    These papers are printed on 130g Kraft paper with a beautiful pattern on one side then plain kraft on the other ( so geat for using up all those little scraps we have left over ) They cut and fold well and so are perfect for all our card making and scrapbooking projects.

   I have teenage Nephews so I am always looking for ways to give them the money they ask for for birthdays and Christmas in a way that looks like I have put some thought into it. This little money envelope is perfect for any age as the paper you use to make it alters the look. It is cut on my Silhouette Cameo, the paper cut beautifully.


This one I actually made to give to my Mum as part of her birthday gift so to add a little bit of sparkle I used my glitter pen to draw around the design, which worked very well.


You could even use a quicky glue pen and glitter too which would look amazing.


As you can see this paper is very versitile as being kraft on the wrong side both sides can be used.

This range comes in 4 different paterns and 5 different colours. I used the purple daisy for this project.

You can find all the papers in the range in the Fruit  Pixie shop here - 
http://www.thefruitpixie.co.uk/12-payper-box-695-c.asp

the quicky glue pen here -
 http://www.thefruitpixie.co.uk/sakura-quickie-glue-pen-5213-p.asp

glitters here -
http://www.thefruitpixie.co.uk/cosmic-shimmer-polished-silk-glitter-600-c.asp