Saturday, May 28, 2016

  I am still spellbound by the Graphic 45 Enchanted Forest papers that you can find in the shop ( link will be at the bottom of the post )  I have been working with Graphic 45 papers ever since they started but one thing I have noticed that is new and such a good idea is the templates they now include on the covers of their 8x8 paper pads.

                     Here they are. Excuse the dark pictures, it was such a dull day, but you get the idea.


As you can see you get all sorts of tags and a wonderful pillow box. These are great because you have the beautifully printed card on the other side and as it is the cover of the paper pad it is perfect for them.

So I thought I would make the pillow box up for you to show you how it looks. Of course the savvy crafter would  make a template from them too!

  All I did was take the cover with the pillow box printed onto it and cut it out along the solid lines. You then need to crease the dotted lines. The easiest way to do this is to find something soft, like an old fashion mouse mat or just a few pieces of scrap paper and then using a bone folder or the end of the handle of a spoon draw along the dotted lines. You can use a ruler to guide your scoring for the straight bit but for the curves you have to do it freehand.

Apply wet glue to the straight flap and stick it to the straight side on the other side, allow to dry. You will then find your flaps at either ends will fold down beautifully to close the box and give it its shape.


Of course you then need to decorate your lovely pillow box now. I chose a panel from the paper pad and cut a couple of swirls, also from the paper pad, using the Sue Wilson splendid swirls.


I also cut out one of the tags and just decorated it with a couple of the cute little stamps that are also in the paper pad.

The Graphic 45 Enchanted Forest is a really beautiful collection and the addition of all these templates just gives you somewhere to start.

You can find the Enchanted Forest Collection papers in The Fruit Pixie online shop here -  http://www.thefruitpixie.co.uk/enchanted-forest-696-c.asp

The Sue Wilson Splendid Swirls dies here - 
 http://www.thefruitpixie.co.uk/sue-wilson-die-splendid-swirls-24678-p.asp

Payper Box bone folder -
 http://www.thefruitpixie.co.uk/payper-box-bone-folder-20088-p.asp


Friday, May 20, 2016

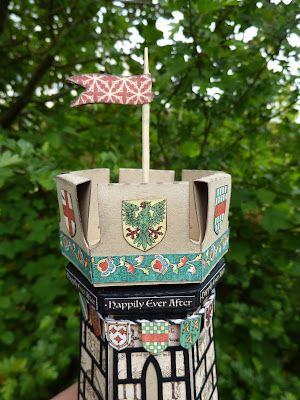
Graphic 45 Enchanted Forest Fairy Tower

     At the moment I am working with the Graphic 45 Enchanted Forest papers for the Fruit Pixie, a wonderful online shop who I design for.
 
     Now, I was playing with these papers at my last crop and a lot of my crafty friends, although they love Graphic 45, said they found then difficult to use because they were too nice and didn't want to spoil them. I have herd many people say this and even felt it myself, but if you keep them in a draw and look at them now and again, where is the real pleasure in that? But if you jump in and make something with them, cut them up and make a beautiful project, you then have had the pleasure of making something and then you can then either use it, looking at it or giving it to someone. Now I think that is far better then having a cupboard full of paper isn't it?

    So with that in mind, here is my first project using these wonderful papers.

  When I first looked through the 12x12 papers and paper pad the first thing that I wanted to make to make a fairy tower. The closest thing I could find was a chess piece made using my Silhouette Cameo.


I increased the size of the tower slightly and cut the pieces out on my machine in craft card. I then used the different elements in the 8x8 paper pack to decorate my tower.


Of course the tower had to have a flag. So I cut down a bamboo skewer and using a die and my die cutting machine cut out a flag from one of the pattern papers.

One of the papers has rows and rows of these wonderful flags. I cut some of them out and glued them to some bakers twine.

There are plenty of boarders and word strips within the patterned papers to cut out and use to decorate your projects.


For the main body of the tower I used the script paper.


Then the base was also decorated with patterned paper and boarders to finish the tower off.


The project all came together so easily as these papers are just so nice to work with. 

I think my Fairy Tower looks right at home among the primroses in our garden don't you ?


Do give these papers a go, there are endless projects you can make with them. I will be showing you a few over the next few blog posts.

you can find the papers in The Fruit Pixie shop here -

http://www.thefruitpixie.co.uk/enchanted-forest-696-c.asp

the bakers twine here - http://www.thefruitpixie.co.uk/fibres-ribbons--trims-54-c.asp


Friday, May 13, 2016

Butterfly shadow box

Here is my last project using the Craftwork cards Time Flies kit I have designed for the Fruit Pixie. This time I have made something that would make a lovely gift or just something for the home, a shadow box.


I made the shadow box using my Silhouette Cameo  electronic cutting machine but you can buy wooden ones online and on the high street fairly cheaply.

I used 2 different papers for the background, edging the second one with ink to match the butterflies.I also covered the frame with strips of the book script paper from the kit.


For the butterflies I popped them out of the die cut sheet and using a quicky glue pen drew a line just inside each butterfly and covered it in the Cosmic Shimmer polished silk glitter. I also added tiny gems from my goodies to the centre of some of them.

I folded the butterflies down the centre attached them to the background using a wet glue.


I then stamped Live your dreams by Visible Image in a purple ink onto the same paper as the background and cut them out. Then when I glued them to the background it looked as if I had stamped them straight onto the background.


So there we have it all done!


I hope you have enjoyed seeing what I have done with this kit, there is still so much you could do but so much wonderful stuff to play with............

You can find these products in the Fruit Pixie online shop

Craftwork cards Time Flies paper kit here - http://www.thefruitpixie.co.uk/craftwork-cards-8-x-8-collection-pack-time-flies-25760-p.asp

Cosmic Shimmer glitter here - http://www.thefruitpixie.co.uk/cosmic-shimmer-polished-silk-glitter-600-c.asp

Live your dreams stamp here - http://www.thefruitpixie.co.uk/visible-image-live-your-dreams-23095-p.asp


Sunday, May 08, 2016

Learning English Paper Piecing

I have started to teach myself English Paper Piecing patchwork ( EPP). I have made 2 quilts the modern way, using a sewing machine to sew the pieces together but decided the bit I enjoyed the most was the hand sewing. So I thought I would give this a try, it's the old fashion way to patchwork using paper pieces to shape your fabric and then hand stitch the pieces together.

  I treated myself to 2 wonderful books that I really recommend


This book takes you through every shape you will need to EPP with and how to stitch with them.


This book also explains very clearly how to EPP and also gives you projects to try too with instructions and patterns.

They both have wonderful instructions, photos and ideas. They have both been my constant companions.

For my first project I made the little pouch from the Quilting on the go book.


I love it it is so sweet and useful too and it was very easy to make. 

A few things I have found from a papercrafters point of view that has really helped.

1. I used my dies and die cutting machine to cut the paper pieces for my project. You could also cut the fabric but I only had a cheaper set of dies which was fine for paper and card but not fabric. I have now upgraded my hexes set.

2. Great way to use up all those off cuts of card we all have too.

3. I also used my Silhouette Cameo to cut my pieces for my latest project. You can import Jpeg and size and cut extremely accurately in large numbers quickly.

This is such a nice hobby to sit and do out and about or in front of the TV. So far I have stitched on the bus, in parks in Vienna ( I made a cushion cover while on holiday, more about that in another post) at my parents house, in the garden sat in the sun and in the evening in front of the TV.

I think I have found another love! Why not try it too?


Friday, May 06, 2016

Craftwork cards Time Flies flower card

 Here is another card I have made using the Craftwork cards Time flies kit for The Fruit Pixie.

   This kit, along with the beautiful papers, also has wonderful flower and butterfly die cuts. It also comes with the matching Candies which I have used on this card too.


The card blank was cut using my Silhouette Cameo but there are all sorts of lovely card base shapes on the market you can play with.

I covered the base with the lovely papers and used some of the borders that come in the kit as well, down the sides

For the main focal point in the centre I used the Candies to make a frame around the circle. Now Candies if you have not come across them before are small domed rounds of paper, they say they are a brad without legs. I find the best way to attach then is a small square of 3d foam.

I then added one of the die cut flowers and a butterfly, to which I had added wire antenna 


In the centre of the flower I added more of the Candies.

As you can see this kit is beautiful and so nice to work with.

You can find the kit in the Fruit Pixie shop 
here - http://www.thefruitpixie.co.uk/craftwork-cards-8-x-8-collection-pack-time-flies-25760-p.asp