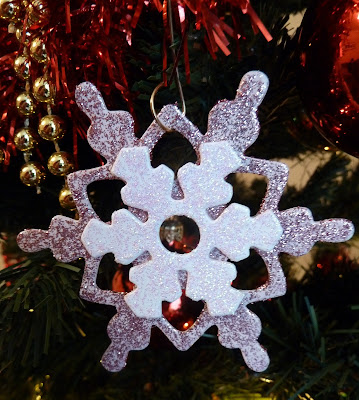
For me Christmas snowflakes have to sparkle, that's just the law, but I also wanted them to have colour too. The best way to get both I found was to paint then first and then glitter them.
For this one I painted the largest snowflake with the Cosmic Shimmer chalk paint Alice Blue, the middle snowflake Cosmic Shimmer Nude and the top one with the Cosmic Shimmer Warm White.
For the glitter I reached for my Cosmic Shimmer Sparkle texture paste which I applies with a paint brush. The largest snowflake is covered in Silver Moon sparkle paste, the middle one in Pink Blush sparkle paste and the top one in Aurora sparkle paste.
I left them all to dry over night then layered them up using PVA glue. You will need a wet glue because of all that wonderful glitter! I then added a gem to finish it off.
Snowflake 2 was painted with the Cosmic Shimmer chalk paints Nude and Warm White and then covered in the Cosmic Shimmer sparkle paste Pink Blush over the Nude paint and then Aurora sparkle paste over the Warm White chalk paint.
Again I left them to dry over night and layered them up using PVA glue.
For the final snowflake I decided to try a darker colour. The top snowflake was painted with PaperArtsy London night paint and the bottom snowflake in PaperArtsy Snowflake.
I then covered them in the Cosmic Shimmer sparkle paste Silver Moon over the London night paint and Aurora Cosmic Shimmer sparkle paste over the Snowflake paint.
It was made in the same way as the others and a large gem added at the end to finish it off.
These look so pretty hung on the tree.
You can find what I used in the Frute Pixie shop by following these links -
WoodWare Snowflake Chippies - http://www.thefruitpixie.co.uk/woodware-chipboard-414-c.asp
Cosmic Shimmer Chalk paint - http://www.thefruitpixie.co.uk/cosmic-shimmer-paints-644-c.asp
Cosmic Shimmer Sparkle paste - http://www.thefruitpixie.co.uk/cosmic-shimmer-texture-paste-622-c.asp
The gems are from my own stock


No comments:
Post a Comment